

This guide illustrates how to set up the snake method in a Weber kettle, however once you understand the theory you can apply it to other BBQs too!
This article is the first in a series of how-tos across a variety of BBQ techniques – if you have any specific techniques leave a comment and I’m happy to help!
I’m also mindful there is no one way to do things so if you have a different idea or approach you would like to share I’m always up for a discussion.
The snake method works by running a long ring of unlit charcoal briquettes around the outside of your weber. By then placing a few lit briquettes at one end of your “snake” you are able to keep a consistent low temperature for a long period of time as the lit beads gradually light the unlit beads.
“But Gus, don’t heatbeads and other briquettes give off a kerosene flavour to the meat?”
Firstly, that’s Mr Grillah to you, and secondly – no. This is a fairly common misconception. As long as there is enough oxygen and airflow in your pit you shouldn’t notice any strange flavours. Problems typically occur when there is not enough oxygen and the beads smoulder – for instance if you dumped a dozen unlit briquettes on top of two lit ones you’d have a bad time. Follow the snake method correctly and I guarantee* your food will turn out great.
*Disclaimer: in no way an actual guarantee.
Weber kettle (Gumtree is a great option – the model in these pictures is a 1981 kettle purchased for $15 – new ones are shiny and beautiful though)
5kg Heatbeads – I like the heatbeads brand briquettes, they’re a uniform shape and have a long burn which is what the snake requires.
Water pan
Smoking wood of choice (chunks are best but chips will work too)
Strap on your seat belts folks, this is going to get pretty heavy on the pictures.

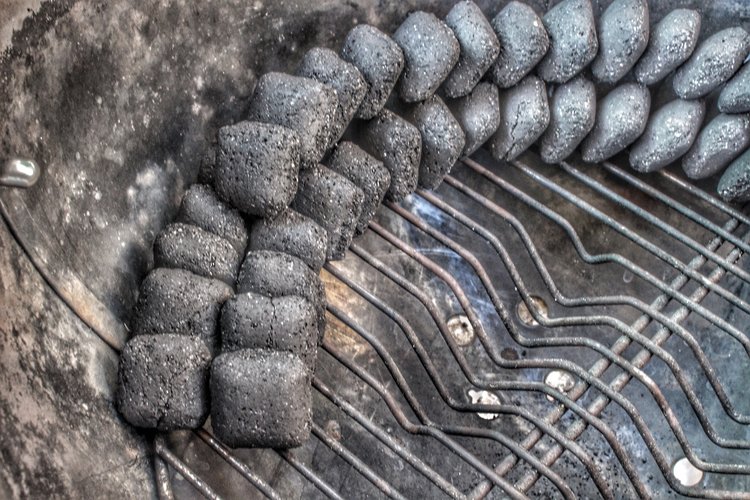
Begin by making a row two heatbeads wide around the edge of your weber, leaving a gap for your water pan. Occasionally you will come across a funny shaped briquette in your bag – I don’t like to use these for the snake, but they’re perfectly useable for all other methods of BBQ.
In the picture above I started on the right hand side, working anti-clockwise around the kettle ensuring each new row of heatbeads is leaning on those prior.
Note: the snake above can run about 12-15 hours, if you’re doing a shorter cook you can make a shorter snake, however I would suggest always laying out a full snake as you can re-use any unused heatbeads by shutting down all your vents once you’ve finished cooking.
Now run a single row of heatbeads on top of your existing snake. Start from the same end as last time, in this case again from the right hand side running anti-clockwise.
It doesn’t matter which way you run your snake, however it is important you start it so that it runs in the same direction the briquettes are leaning.
Stop the top row three briquettes from the end – this is where your lit beads will be placed, like lighting a fuse.
Speaking of lit beads, I usually get some briquettes heating up around the time I start my second row. You’ll need around 10 for the snake but heat up a few more to have some spare. Use a chimney starter or whatever method you have for lighting heatbeads, up to you.
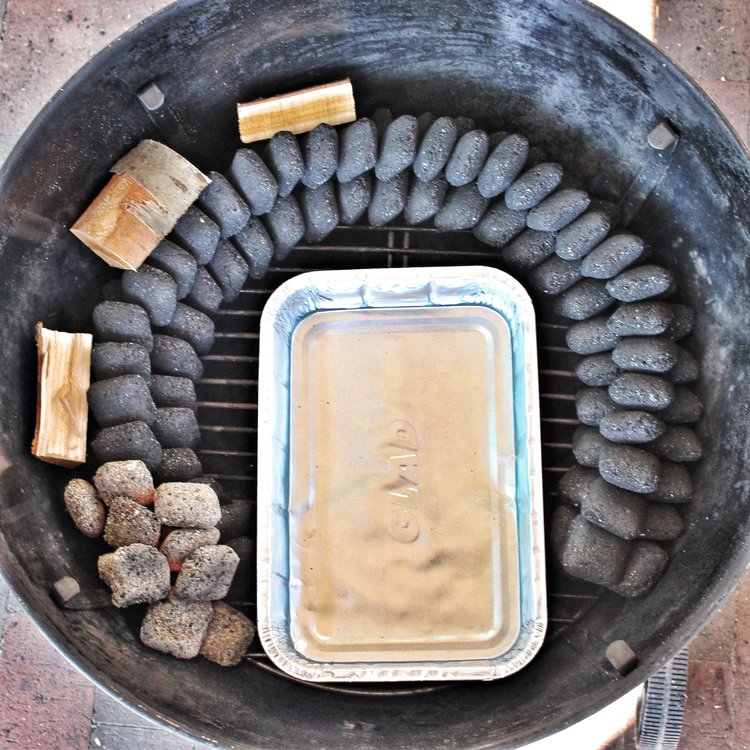
Time to add in the smoking wood of your choice and a water pan.
I usually place a few pieces around the first half of the snake. I generally don’t bother with the second half as meats take on the greatest amount of smoke earlier in the cook plus I may be wrapping later in the cook. I’ll generally pop a final chunk on top of the lit beads once they’re on too.
How much wood you use is really up to you – want a lot of smoke? Run more wood along your snake. I prefer chunks but chips can work too.
The water pan serves two purposes: heat sync and moisture.
A big tray of water absorbs heat and this will ultimately smooth out the temperature in the pit.
As that water heats up and begins to steam this will also add moisture into the cook chamber. However it’s much less steam than say a typical set up on a vertical smoker where the heat source is directly below the water pan. I put exactly 2 litres of water into the water pan and at the end of this 14 hour test I still had around 600ml, so not a huge amount of steam over 14 hours.
Get your lit heatbeads and begin placing them on the spot you created for them earlier, tongs are a good idea as you want the precision to be able to put them leaning up against some of the unlit beads otherwise your snake won’t catch.
I placed a total of 10 lit beads on the end of this snake.
At this point I also usually add one more chunk of smoking wood directly on the lit coals to get this party started.
You’re now ready to cook! Place your main grate back in the weber and put whatever you have chosen to cook above the water tray (as this will also catch the drippings). If you’re not sure what you want to cook pulled pork is always a great option to start out with.
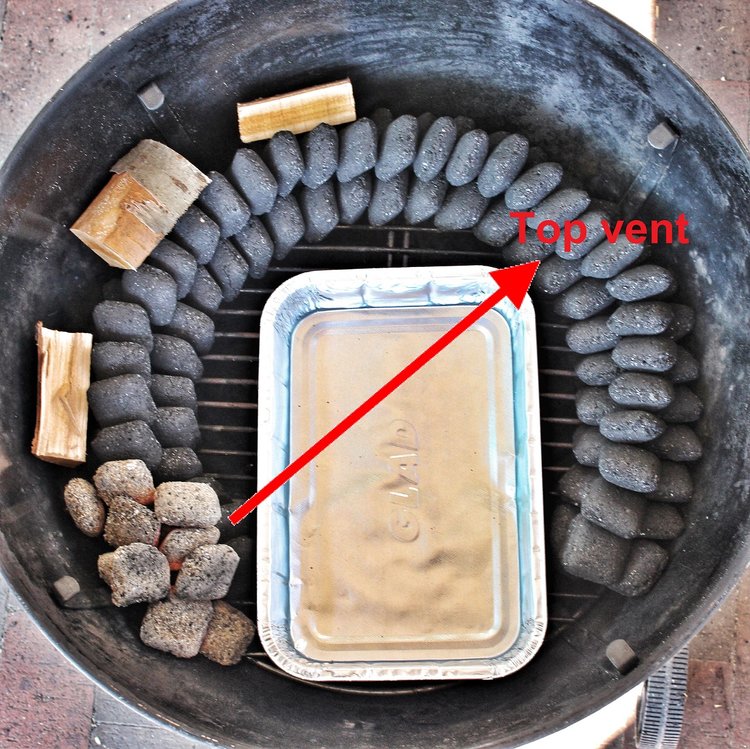
When placing your lid on the weber it is important to consider the top vent position. As per my sweet diagram above the top vent should be positioned opposite your lit beads. This will help draw the heat and the smoke across your meat before exiting the smoker.
During the cook you will need to adjust your lid accordingly – the snake doesn’t move too fast so every two to three hours will suffice.
At this point you want both your top and bottom vents to be fully open.
OK so you’ve set up your snake – what now?
To be honest with you, these days I just let the snake run once I’ve set it up knowing that some days it will run a bit hotter than others but don’t actually check what temperature it’s running at.
For the purpose of this article though I ran the temperature gauge in the weber after setting it up so that we can see exactly what goes on in there.
(At this point I was going to have a graph to show you but I buggered up exporting it off the iGrill so you get nothing).
The snake pictured above ran for a total of 14 hours and sat around 280-290f (137-143c) the entire time.
If the weber had been fully loaded I think you would find the pit temp to be lower as a result of the big chunk of meat absorbing heat. I would have expected fully loaded that snake would have run somewhere in the 260-275f range which is great for barbecue.
If you do find your weber is running a bit too hot there are two controls you have at your disposal: the top and the bottom vent. Start with the top vent to slow down the draw of oxygen through your pit – however be aware you still want smoke to have a means of escape (otherwise you may end up with a creosote flavour on your meat) so I would advise not closing your top vent more than one third.
If that doesn’t work you can adopt the same approach with your bottom vent to slow down the amount of oxygen entering your pit.
With either vent it is absolutely crucial you make small changes and give them enough time to take effect.
In fact I’m going to say that again: make small changes and give them enough time to take effect.
When I first did snake method I had probes hanging out all over the place and I was trying to hit that magic 225f temperature that I’d heard was the ONLY way to cook barbecue.
Temp went up and I start shutting down all my vents, fire started choking out and temp dropping so I was opening the vents right up again – it was a mess.
225f (107c) will cook you barbecue, but so will 250, 275 or even 300 and 315f (157c) .
In addition to this I would generally prefer to keep my vents open so the oxygen and smoke are flowing than to risk choking out my snake (pun intended?) or causing the wood to smoulder giving the meat a bitter creosote taste.
So really that’s about it – I hope that adequately explains how to set up a snake in your weber to achieve great low and slow barbecue.
In terms of starting out you can’t get much cheaper – this was set up in a $15 weber made in 1981 and I used $6 of heatbeads to achieve consistent heat over 14 hours.
Not bad bang for your buck.
If you have any questions on the snake method or there are any other guides you would like me to put together let me know in the comments!
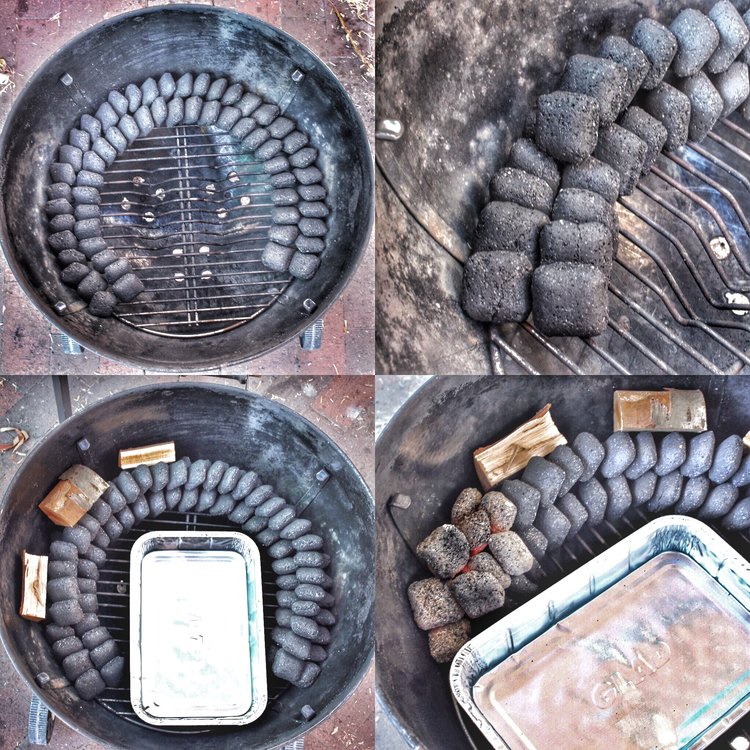
Two wide row of briquettes around edge of the Weber.
Single row of briquettes on top, leaving space for lighting.
Smoking wood around first half of snake.
Water pan in the middle.
10 lit heatbeads on the end of the snake.
Vents fully open to begin, adjust if required.
12-15 hours cooking time.