

We will look at how to set up the minion method as well as a basic set up for the Pro Q Frontier, the most common of the Pro Q series.
There are a couple of ways to set up a bullet smoker, each with their own pros and cons.
This guide is aimed at the simplest way to get you started with your bullet smoker – once you’ve done a few cooks begin to experiment with other set ups.
Before we get stuck in to the minion method set up let’s look at the anatomy of a bullet smoker.
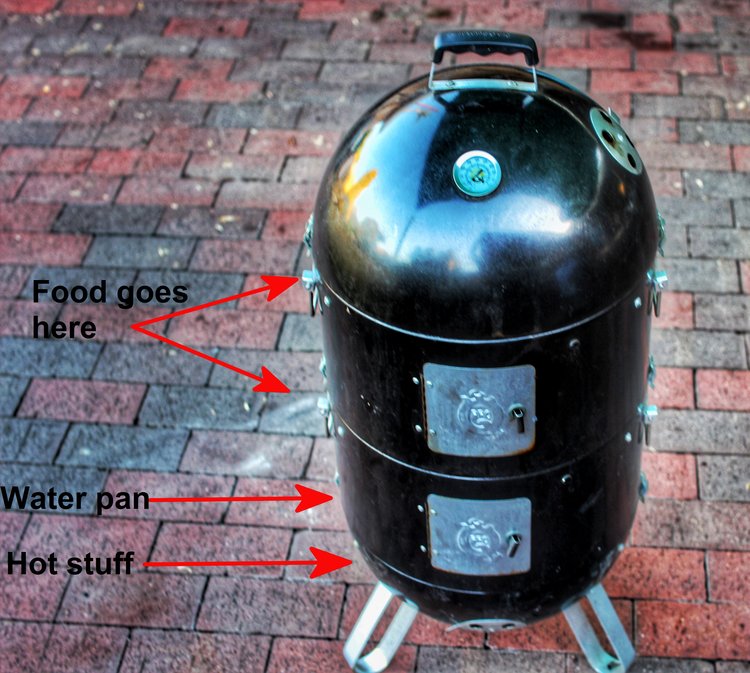
The Pro Q comprises of two grills up top to place your food, a water pan and a charcoal basket down the bottom.
With other styles of smoker we achieve low temperatures by using indirect cooking – where the heat source is adjacent to the meat.
With a vertical style smoker the fire is directly underneath the meat, so we need a means of keeping the temperature low – that’s where the water pan comes in.
The water pan acts as a heat diffuser – the amount of energy required to heat up the water and maintain that heat reduces the overall heat inside the smoker. YEAH SCIENCE.
There are pros and cons to using the water pan. The main pro is that heat diffusion making it super easy to get an even heat inside your vertical smoker. There’s also an argument that the steam generated keeps the meat moist (yeah, I said MOIST, what of it).
The con is that steam generated from the water pan can make it harder to form a bark or crust on the outside of your meat, which is why in our next minion article we will look at a non water pan method also.

The Minion Method works in a similar manner to the Snake Method which we have covered previously, where lit fuel slowly ignites unlit fuel via combustion allowing you to slowly control temps.
The difference with Minion is you use a large pile of unlit fuel rather than the long fuse of the snake. I have two different Minion set ups that I use: The Donut and the Wedge; today we are using the Donut.
Begin by pouring about 4kg (one bag) of heatbeads in your charcoal basket, spreading them out to the side and forming a “donut”. While doing this light the remainder of your heatbeads in a starter chimney or similar.
Note: if you are using a different size Pro Q or different style smoker the minion method will still work you may need to adjust your fuel levels.
You can use a variety of fuel types on your bullet smoker – I quite like lump charcoal, however the intro guide is aimed at using something that is easy and readily available to everyone.
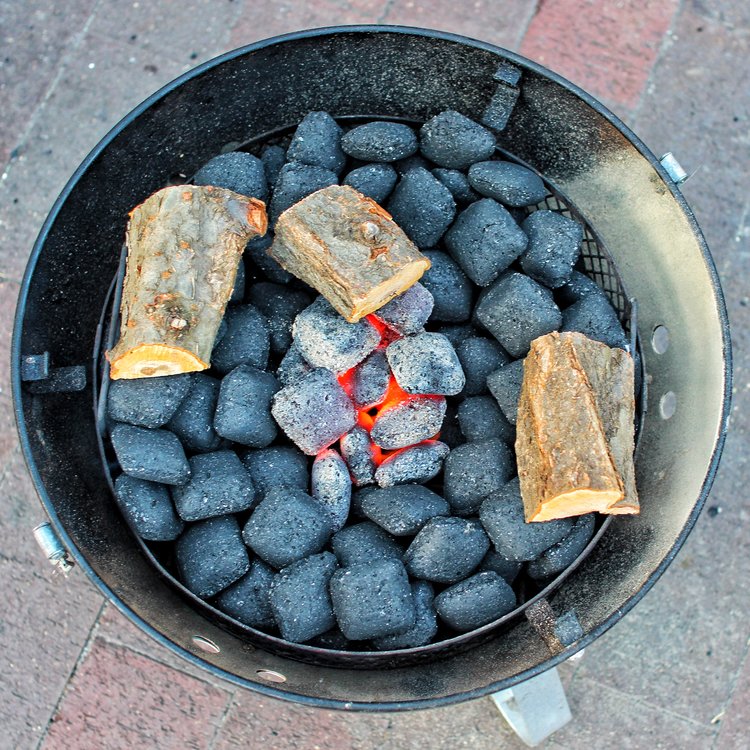
Place lit beads in the middle of the donut – I used 13 heat beads in the above pic, the aim is to fill that hole (that’s what she said!) – but be mindful of how much lit fuel you use.
Add your smoking wood at this point, I add 2-3 chunks, placing one on the lit fuel and the rest adjacent as they will smoke once the remaining fuel begins to light.
Fill your water pan about halfway – I used five litres of water, the Pro Q Frontier water pan has about a 9 litre capacity.
Your vents are your heat control – on the Pro Q I only use the bottom vents to control heat as I want the top vent fully open to let smoke escape and not hang around the cook chamber.
I began this test with one bottom vent fully closed, the remaining two fully open.
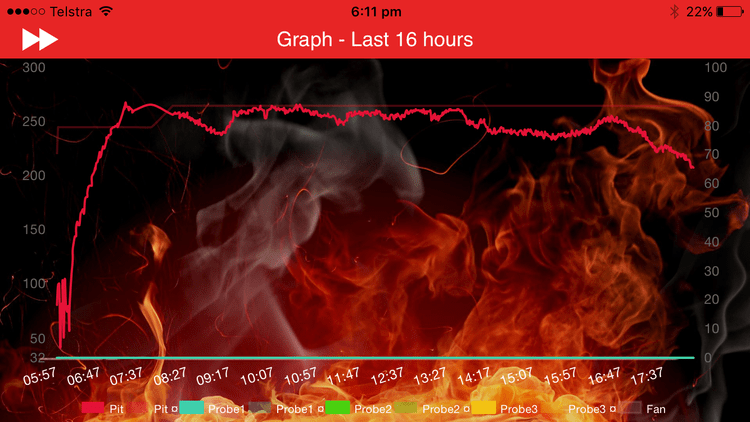
The Pro Q took half an hour to get to a temp of 225f, settling at around 250f for the rest of the guide, total cook time from the one load of fuel was about 11 hours – plenty of time for most cooks.
With this style of smoker it is also extremely easy to add fuel and keep the party going as long as you like. I recently ran my larger Pro Q for 25 hours with a fuel top up halfway and it didn’t skip a beat.
During the guide I had to make a few adjustments to the smoker to keep it at temp:
Your vents are your accelerator and your brake, the more you open them the faster temps will rise and as you shut them temperatures will drop.
The water pan keeps things balanced – if you notice a sudden spike in temperature your water pan has probably emptied, so keep an eye on it and top it up regularly.
Why not read some of my other guides: